-
Learning 3 Point Lighting From The Terms
普通类 -
- 支持
- 批判
- 提问
- 解释
- 补充
- 删除
-
-
Learning 3 Point Lighting
There are three parts to producing a good video: Audio, Framing and Lighting. What I’m going to discuss are The Keys To Lighting. Most people might say,
"What is so difficult about lighting? Don’t you just turn a bunch of lights on and there you go?" No way, it takes years to perfect the skill of lighting. What I hope to accomplish is to give you some background on lighting and some tips to help your next video production look great.
Television is based on the medium of light; in fact, without light there could be no video. Just as sound must be skillfully controlled in audio production, light must be expertly controlled in television..jpg)
-
A light is a light, right ? Wrong.
Here is a break down of the lighting terminology you should know: Base light, Key light, Back light, Fill light, Background light or set light, Side light, kicker light, and the Camera or eye light. These are the lights used in a video situation. But for the purpose of this article, I will be talking about 3-point lighting, which uses the three essential lights: Key light, Fill light and Back light..jpg)
-
Key light
The Key light establishes the dimension, form and surface detail of subject matter. Although the remaining lights have lesser roles, they are nevertheless important in creating an acceptable lighting effect. The key light by itself (whether it is the sun in a clear sky or quartz light on a stand) produces heavy, distracting shadows.-
Fill light
The Fill light fills in the shadows created by the horizontal and vertical angles of the key light. The fill light should be placed about 90-degrees away from the key light. For example if you draw lines from the Key light to the subject and from the Fill light to the
subject, you’ll create a right angle (See figure 1). The Fill light can be positioned right beside the camera. But it’s safest to place the Fill light 45-degrees from the camera.-
Back light
The function of the Back light is to separate the subject from the background by creating a subtle rim of light around the subject. The back light (sometimes called a hair light) should be placed directly behind the subject in relation to the close-up camera. From an overhead perspective you should be able to draw a straight line from the lens of the close-up camera, through the subject, directly to the back light (See figure 2).
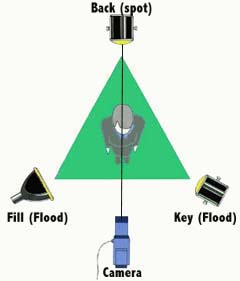
If a back light is placed too far to one side, light will spill around one side of the subject and leave the other side dark.
Although the elevation of the back light is often dictated by conditions, a 45-degree angle is most desirable.-
A tip from the Pros:
"Lighting a full 90-degree area, creates a margin of safety, in case the subjects unexpectedly move and camera angles have to be changed during the production. Stopping a production to change the position of lights is a time-consuming, and very costly delay."
Now that you know about the terminology of 3-point lighting you can give it a test (See figure 3). These are the very basics about lighting. For more information I recommend looking at such magazines as Video Maker and Video, just to name a few. Remember, knowing the terminology is half the battle. If you follow simple steps like these’ you can make any shot look good..jpg)
-
Author
By Manny Andrade -
-
- 标签:
- terms
- light
- subject
- learning
- from
- lighting
- point
- key
-
加入的知识群:


学习元评论 (0条)
聪明如你,不妨在这 发表你的看法与心得 ~